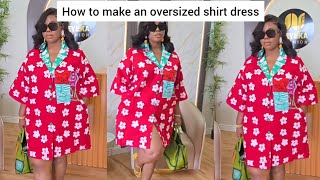
DIY : How to sew an oversized shirt dress #oversizedshirt #bubu
リアクション
2026年06月25日
how to make an oversized shirt dress
Materials
2.5–3.5 yards of fabric depending on length and width
Shirt buttons / snap buttons
Interfacing for collar and front placket
Measuring tape
Tailor’s chalk
Scissors
Sewing machine
Sleeve ruler / curved ruler
Iron
Drafting / Cutting steps
1) Take the basic measurements
Use these:
Full bust
Hip
Shoulder
Neck round
Armhole round
Sleeve length
Dress length
For an oversized fit, add 6–12 inches ease around the bust/hip depending on how loose you want it.
2) Fold your fabric
Fold the fabric into 4 if you want to cut front and back together, or into 2 if you prefer cutting separately.
For a true oversized bubu/shirt gown look, the body is cut almost like a straight shift dress.
3) Mark the body width
Use the largest body measurement between bust and hip.
Formula:
¼ of bust or hip measurement + 2 to 4 inches extra ease
Example:
If hip = 48"
¼ hip = 12"
Add 3–4" for oversized look
= 15–16" on fold
This gives the loose shirt-dress/bubu effect.
4) Mark the dress length
From shoulder line, mark your desired length:
Mini shirt dress
Knee length
Midi
Maxi bubu shirt gown
Add 1–2 inches hem allowance.
5) Draft the neckline
Back neckline
Width: 3–3.5"
Depth: 1–1.5"
Front neckline
Width: same as back
Depth: 4–7" depending on how open you want it
Since this is a shirt dress with collar, don’t make the neck too wide.
6) Mark the shoulder and dropped sleeve
For this style, the shoulder drops down into the sleeve area.
Use half shoulder measurement
Drop the shoulder by 2–4 inches for a relaxed oversized look
Mark your sleeve length from the shoulder line
If you want the exact look in the picture, make the sleeve loose and wide like a kimono/bubu sleeve.
7) Shape the armhole / kimono sleeve
You have 2 options:
Option A — Cut-together kimono/bubu sleeve
Extend from shoulder to your sleeve length
Mark sleeve opening width
Draw a soft curve from underarm to sleeve opening
This creates a loose kimono sleeve attached to the body
Option B — Separate shirt sleeve
Draft a loose short sleeve
Join it to the armhole later
For the dress in the picture, Option A (cut-together sleeve) works very well.
8) Mark the side seam
From bust/hip down to hem, draw a straight or slightly flared line.
For a shift shirt dress:
Keep it almost straight
Add a little flare at hem if you want more movement
9) Create the front opening
Since it is a shirt gown / shirt dress, the front must open.
Separate the front piece at the center front
Add 1.5–2 inches placket allowance
This allowance will be folded to create the button stand
If you want a hidden placket, add enough allowance for turnings.
10) Cut the collar
1) Fuse the collar and placket
Iron interfacing onto the collar pieces and front placket area
This gives the shirt dress structure
2) Sew shoulder seams
If front and back were cut separately:
Join shoulder seams neatly
If you used cut-together kimono/bubu style, you may not need a separate shoulder seam depending on your draft.
3) Prepare the front placket
Fold the center front allowance inward
Press very well
Stitch neatly to form the button placket
One side can be the buttonhole side and the other the button side.
4) Attach the collar
Join collar to collar stand if using a shirt collar
Sew collar to neckline
Turn, topstitch and press
Make sure both front edges align evenly.
5) Sew the side seams
Match underarm points
Sew from sleeve down to hem if it is a cut-together kimono/bubu style
Or sew body side seam and sleeve seam separately if using separate sleeves
6) Hem the sleeves
Fold sleeve edge in twice and stitch neatly.
7) Hem the bottom
Fold hem allowance, press and stitch.
8) Add buttons and buttonholes
DIY : how to sew a simple kimono top with front lacing with balloon skirt
https://youtu.be/9c-mkqQqfok
Diy : How to sew a ruched shoulder under burst shirred gathered dress #how
https://youtu.be/hAKIxYoSDFM
DIY : How to sew a an underburst shirred top #underburstcorset #viral
https://youtu.be/0OuiiLCI6F0
Diy : How to sew a layered skirt /Easy beginner tutorial #skirt
https://youtu.be/tQzf5B5KqgQ
#OversizedShirtDress
#ShirtDressTutorial
#HowToSewShirtDress
#HowToCutAndSewShirtDress
#BubuShirtGown
#BubuDressTutorial
#HowToCutBubu
#HowToSewBubuDress
#BubuWithCollar
#KimonoDressTutorial
#HowToCutAndSewKimono
#KimonoGownTutorial
#ShiftDressTutorial
#CutTogetherDress
#CutTogetherShiftDress
#EasyDressTutorial
#SewingTutorial
#DressCuttingTutorial
#PatternDrafting
#SewingForBeginners
#DIYFashion
#FashionDesignTutorial
#AfricanFashionTutorial
#AnkaraSewingTutorial
#PlusSizeDressTutorial
#LooseGownTutorial
#ButtonDownDress
#CollarDressTutorial
#ShirtGownTutorial
#DressMakingClass
Materials
2.5–3.5 yards of fabric depending on length and width
Shirt buttons / snap buttons
Interfacing for collar and front placket
Measuring tape
Tailor’s chalk
Scissors
Sewing machine
Sleeve ruler / curved ruler
Iron
Drafting / Cutting steps
1) Take the basic measurements
Use these:
Full bust
Hip
Shoulder
Neck round
Armhole round
Sleeve length
Dress length
For an oversized fit, add 6–12 inches ease around the bust/hip depending on how loose you want it.
2) Fold your fabric
Fold the fabric into 4 if you want to cut front and back together, or into 2 if you prefer cutting separately.
For a true oversized bubu/shirt gown look, the body is cut almost like a straight shift dress.
3) Mark the body width
Use the largest body measurement between bust and hip.
Formula:
¼ of bust or hip measurement + 2 to 4 inches extra ease
Example:
If hip = 48"
¼ hip = 12"
Add 3–4" for oversized look
= 15–16" on fold
This gives the loose shirt-dress/bubu effect.
4) Mark the dress length
From shoulder line, mark your desired length:
Mini shirt dress
Knee length
Midi
Maxi bubu shirt gown
Add 1–2 inches hem allowance.
5) Draft the neckline
Back neckline
Width: 3–3.5"
Depth: 1–1.5"
Front neckline
Width: same as back
Depth: 4–7" depending on how open you want it
Since this is a shirt dress with collar, don’t make the neck too wide.
6) Mark the shoulder and dropped sleeve
For this style, the shoulder drops down into the sleeve area.
Use half shoulder measurement
Drop the shoulder by 2–4 inches for a relaxed oversized look
Mark your sleeve length from the shoulder line
If you want the exact look in the picture, make the sleeve loose and wide like a kimono/bubu sleeve.
7) Shape the armhole / kimono sleeve
You have 2 options:
Option A — Cut-together kimono/bubu sleeve
Extend from shoulder to your sleeve length
Mark sleeve opening width
Draw a soft curve from underarm to sleeve opening
This creates a loose kimono sleeve attached to the body
Option B — Separate shirt sleeve
Draft a loose short sleeve
Join it to the armhole later
For the dress in the picture, Option A (cut-together sleeve) works very well.
8) Mark the side seam
From bust/hip down to hem, draw a straight or slightly flared line.
For a shift shirt dress:
Keep it almost straight
Add a little flare at hem if you want more movement
9) Create the front opening
Since it is a shirt gown / shirt dress, the front must open.
Separate the front piece at the center front
Add 1.5–2 inches placket allowance
This allowance will be folded to create the button stand
If you want a hidden placket, add enough allowance for turnings.
10) Cut the collar
1) Fuse the collar and placket
Iron interfacing onto the collar pieces and front placket area
This gives the shirt dress structure
2) Sew shoulder seams
If front and back were cut separately:
Join shoulder seams neatly
If you used cut-together kimono/bubu style, you may not need a separate shoulder seam depending on your draft.
3) Prepare the front placket
Fold the center front allowance inward
Press very well
Stitch neatly to form the button placket
One side can be the buttonhole side and the other the button side.
4) Attach the collar
Join collar to collar stand if using a shirt collar
Sew collar to neckline
Turn, topstitch and press
Make sure both front edges align evenly.
5) Sew the side seams
Match underarm points
Sew from sleeve down to hem if it is a cut-together kimono/bubu style
Or sew body side seam and sleeve seam separately if using separate sleeves
6) Hem the sleeves
Fold sleeve edge in twice and stitch neatly.
7) Hem the bottom
Fold hem allowance, press and stitch.
8) Add buttons and buttonholes
DIY : how to sew a simple kimono top with front lacing with balloon skirt
https://youtu.be/9c-mkqQqfok
Diy : How to sew a ruched shoulder under burst shirred gathered dress #how
https://youtu.be/hAKIxYoSDFM
DIY : How to sew a an underburst shirred top #underburstcorset #viral
https://youtu.be/0OuiiLCI6F0
Diy : How to sew a layered skirt /Easy beginner tutorial #skirt
https://youtu.be/tQzf5B5KqgQ
#OversizedShirtDress
#ShirtDressTutorial
#HowToSewShirtDress
#HowToCutAndSewShirtDress
#BubuShirtGown
#BubuDressTutorial
#HowToCutBubu
#HowToSewBubuDress
#BubuWithCollar
#KimonoDressTutorial
#HowToCutAndSewKimono
#KimonoGownTutorial
#ShiftDressTutorial
#CutTogetherDress
#CutTogetherShiftDress
#EasyDressTutorial
#SewingTutorial
#DressCuttingTutorial
#PatternDrafting
#SewingForBeginners
#DIYFashion
#FashionDesignTutorial
#AfricanFashionTutorial
#AnkaraSewingTutorial
#PlusSizeDressTutorial
#LooseGownTutorial
#ButtonDownDress
#CollarDressTutorial
#ShirtGownTutorial
#DressMakingClass